Level 3 Admin, PA and Secretarial Diploma

Module 15: Typing and audio skills to proficient level or further if you already touch type/Audio transcribe
Duration: Approx 1 minutes
Listen to the Module
In this module you will learn:
- Improve your typing skills beyond a beginner level
- Tips on how to improve your touch typing
- How to effectively transcribe audio
- Mistakes and errors to avoid
- Why are typing and audio transcribing skills important?
15.1 Introduction

Touch typing is a crucial skill, especially in this digital age.
Typing skills have to keep pace with modern office technology and gadgetry. It's very simple: Slow and diffident typing and audio skills will leave you at a disadvantage when it comes to completing office tasks. Performance and learning will be restricted and it will prove challenging to keep up with the workload. Efficient typing and audio skills helps personal assistants and secretaries cope with a digital environment that uses text as the main form of communication.
A high typing speed helps you maximise your time and productivity in the workplace. Your typing skills could make all the difference between being picked for a promotion and being left out.
Diligent practice with an attention to quality and efficiency is a good way to improve.
Every form of communication from writing reports, preparing emails and office memos is done with the help of touch typing. In short, whatever we used to do with the help of pen and paper is now done with the help of a keyboard and monitor.
Check out these tips to help you improve your speed. As with other skills, learning typing skills involves patience and perseverance.
15.2 What are some of the important benefits of touch typing and why should you learn it?
 Touch typing is a much better method compared to the traditional hunt and peck method.
 Learning to touch type improves your employability and helps save on time. The time factor plays a very important role.
Here's an example to illustrate the point.
If you type at say 20 words per minute, it's going to take you roughly about 30 minutes to type out a one page document. In fact, if you add in thinking and focus time, it may take closer to an hour to complete one document.
On the other hand, if your typing speed goes up to say 60 words per minute, you can get a page done in under 10 minutes and devote your time to other tasks at hand.
Traditional methods of typing involve relying on sight to spot keys; this can often lead to lapses and mistakes where you have to keep backtracking to correct mistakes. This can lead to a waste of time and concentration.
Touch typing helps your learning by using motor memory skills rather than sight. The result is less time spent on correcting errors and better concentration levels. If you have more free time, you can even consider relaxing your aching shoulders, wrists and neck. Touch typing is known to increase productivity, inculcate healthy typing habits and make typing an enjoyable experience.
FACT
Barbara Blackburn holds the record for the fastest typing. She was able to sustain 150 words per minute over a 50 minute period. Her peak speed was 212 words per minute!
Source: elearningindustry.com
15.3 What is Touch Typing?
Touch typing was invented in 1888 by Frank McGurrin.
The technique involves typing without using your eyes to look at the keyboard. Touch typing involves placing 8 fingers horizontally over the middle of the keyboard where each finger has a designated number and area of keys to press when typing.
Focus on your Technique
Touch typing is 80% technique, 10% accuracy and 10% speed.
People who are masters at touch typing will tell you that without proper hand position and typing technique, you'll only be able to type at a limited speed. Typing each button and looking for each one around the keyboard can never compare to quick and accurate touch typing. Formulating a proper technique will help you type much faster and will eventually help you learn how to touch type.
Learn from Errors
Learning to touch type will be accompanied by many errors; most of us cannot escape this fact when we initially learn our way around the keyboard. Repetition is the key to learning with anything, so the more you do it, the easier it will become over time.
Touch typing is about mental energy and muscle memory; our muscles learn and remember certain techniques that we do over and over. Type as often as you can and this will engrave the movements into your muscle memory. Study and test yourself in each technique before moving on to more complex techniques.
Use Good Posture
Make sure you are sat in a comfortable position when at work or typing at home. Poor posture will only result in strain and stress on neck, back and shoulder muscles.
Good upright posture in your spine will increase your overall alertness and help you concentrate for longer. Focus on the best place to place your fingers. You should be relaxed with your feet resting squarely on the floor.
Your head should be slightly tilted forward and elbows should be kept at a right angle. There should be a distance of at least 45 to 70 cm between your eyes and the computer screen. The wrists should just touch the table top; avoid putting body pressure on the wrists.
Stop looking at the Keyboard
To increase your typing speed in a short space of time, stop looking down at the keyboard. This will lead to more mistakes at first but will dramatically reduce over time. Look at the screen and let your fingers learn where each letter or function is on the keyboard.
Touch typing should be one of your main skills as a personal assistant or admin worker.
15.4 Typing Strategy
 A touch typist would place their fingers in the start position as previously mentioned.
 Learning at a beginner level usually involves printing exercises that contain only letters that are near the standard position or on it. This would then be followed by an attempt to master the other rows. It is important to learn where to position each finger when you start as you cannot look at the keyboard once you begin.
The starting row consisting of ASDF JKL is located in the middle row and these are the keys that you can always return to easily.
One hand should always be kept near the mouse for navigational purposes. Keys F and J often have functions that allow you to perform commands without having to point or click; these are referred to as 'shortcut keys'.
Touch Typing Skills and Tips
- Keep your finger movement limited to finding the keys which you want. At first, only practise feeling the 'home row'.
- You may wish to concentrate on moving the little finger and ring fingers as they tend to be underdeveloped.
- Remember to scan the text about one or two words in advance; this will help you keep up with the speed.
- Touch typing takes a little time to practise, but eventually you will be able to type without looking at the keyboard. Your fingers will move expertly over the keys by force of habit and motor memory.
- After the home row, you need to learn the lower and upper rows of keys followed by special characters, numbers and upper case letters.
- The second stage involves memorising commonly used syllables for faster typing. The third stage involves actual typing practice of text. The main objective is to try to type without looking at the keyboard.
- It helps to establish and maintain a rhythm while typing. This helps ensure that key strokes fall at regular intervals.
- Keep keystrokes light and avoid using excessive force. This helps increase speed.
Activity 1 - Touch Typing Practice
Estimated time: 10-15 minutes
Since you learned business writing skills and have probably used a computer before, the chances are good that you have typed before. However, this module covers another form of typing called touch typing, which is designed for 80 percent technique, 10 percent accuracy, and 10 percent speed.
Position yourself in front of your computer for some typing practice. Ensure that you have good posture and your feet are placed flat on the floor. Following the tips in the module, spend the next 10-15 minutes practising the touch-typing technique.
15.5 Audio Transcription
 Audio transcription is the process where one listens to audio text and transforms it into written text.
In earlier years, a transcriber would actually sit and write words as they were being spoken. This meant that companies had to depend on the physical presence of a trained subscriber to take down conversations.
Transcription is now done by recording the speech and then replaying it through headphones in order to type it out.
The introduction of speech recognition and dictation software has also contributed to the evolution of transcription techniques. However, there are flaws with computer driven transcription software as it works on the basis of recognition of specific speech patterns.
Please note that audio transcription is specialised work and goes beyond simple touch typing skills.
15.6 Benefits of Audio Transcription Services
Most businesses insist on saving hard copies of audio files for their records.
Many times, having a text version of an audio file makes it much easier to understand what is being said compared to straining to listen to different voices, accents and tones. Audio transcribers are highly trained and experienced professionals who are responsible for transforming audio files into coherent hard copies of textual content.
These hard copies can then be used to create other literature, documents and records. Transcription services are indispensable for most businesses. If you become a trained transcriber, your employability increases dramatically as transcription services are always in demand.
Audio Transcription Tips
- Start your transcribing sessions with headphones that are of good quality. Using headphones will stop you from being distracted and you will also hear the sound much better.
- Good earphones especially play an important part if there are multiple speakers, different accents and certain levels of background noise. Your hearing skills need to be really sharp.
- If you are receiving a pre-recorded session, adjust the volume to suit you.
- Agree on a uniform and consistent format for transcription. That way you will stick to the same formula and work on it.
- Always clearly mark who is saying what.
- Is your audio Non-verbatim or Verbatim? Non-verbatim means you type the initial conversation and leave out all stutters or pauses etc. Verbatim is where you record EXACTLY what the audio file plays like. In this case, describe everything in exactly the sequence as it occurs.
- Listen to the file in 30 second segments, record the audio and then do the next 30 seconds. Bite size audio will be less overwhelming to your ears.
- Avoid playing the audio too loud as this will give you an earache when listening to a long audio file; also opt in for comfortable headphones.
- Only type as fast as you are able to without errors and mistakes. If you type too fast to match the speed of the audio, you may have to spend a lot of time proofreading your work and correcting errors. As a matter of fact, you may wish to consider proofreading as you type. This will help save time and you can guarantee a high quality transcription.
- Use ready-made templates which are particularly useful when you offer transcription services for the legal and medical sectors. This will save you time and effort.
- You may wish to take regular breaks to keep your mind active and quick.
- Save the recording in a high-resolution format.
Take a Quick Recap Test
Activity 2 - Practise with Audio Transcription
Estimated time: 10-15 minutes
You should have spent at least ten minutes practising touch typing, which is an extremely valuable skill in your career.
As you move on to this activity, we will focus on audio transcription. So, you will spend another 10-15 minutes at your computer. This time, try to locate an audio file or pre-recorded transcription and spend some time transcribing it to text.
Assignment
Typing and audio skills to proficient level or further
Time: 30+ minutes
Hopefully, you took in as much of the information in this 15th module as possible. To find out how well you have done, complete the following worksheet.
Download the worksheet below and complete.
Module Summary
You have learned what touch typing is and how to improve on it. You have read and learned the basics, format and our general tips that can help you improve your typing skills at any level. You know how to position yourself and we have validated how important touch typing is in your job role as a personal assistant.
Touch typing is an evolved version of traditional typing. It involves typing without peering down at the keyboard to search for keys. Touch typing technique is preferred for its combination of efficiency and speed. As you practise, you gradually learn to type without looking down at the keyboard at all. Touch typing helps maximise productivity and saves time.
Transcription is the conversion of audio files into text formats. The technique involves listening to speech and typing it at the same time. This is a specialised skill and involves training and experience. A pair of high quality headphones is necessary for accurate and precise transcription.
Learning Topics
- The role of a personal assistant/secretary
- Associated job role and responsibilities
- Requisite skills required for the job
- The difference between a personal assistant and a secretary
Learning Topics
- Manage dates, times and schedule appointments
- How to be creative and develop a user-friendly diary system
- Use our tips and implement them into the role of a PA
- How to plan ahead successfully
Learning Topics
- How to write a good business letter
- How a business letter should be structured and edited
- Common mistakes to avoid
- How to be persuasive while maintaining courtesy
Learning Topics
- How to compose and send faxes
- How to write memorandums
- How to create and send emails
- Things to avoid when doing the above
Learning Topics
- How to make phone calls and speak in a professional tone
- Tips on how you should communicate with people over the phone
- Mistakes that should be avoided while communicating on the telephone
- How to conduct business and represent your company over the phone
Learning Topics
- What you should look for when booking a hotel for business travel
- Things you should avoid when making travel arrangements
- How to plan and execute a successful business trip
- The role of a PA in booking hotels and making other travel arrangements for business travel
Learning Topics
- How to set up a good filing system
- What you should avoid when creating a filing system
- How to categorise, sub-categorise and manage your filing system
- Why it is important to have a good system when running a successful business
Learning Topics
- How to manage your time at work efficiently
- What to avoid when trying to get tasks done
- How to improve on your weak points
- How to identify the importance of tasks
Learning Topics
- How to create invoices and send them
- What you should avoid when creating invoices
- How to handle petty cash
- Why invoicing and petty cash handling are crucial to a business
Learning Topics
- The importance of customer care
- Your role as a PA when dealing with customers
- Things you should avoid when dealing with customer care
- How to represent your company in a professional manner
Learning Topics
- How to handle customer complaints
- Understand and execute a proper complaints procedure
- What should be avoided when dealing with complaints
- The importance of a good complaints procedure
Learning Topics
- How to plan your work into a schedule
- The importance of proper work planning
- Things you should avoid when planning your work
- How to structure your plans for improved efficiency
Learning Topics
- How to present written documents
- The basics of what to include when preparing and sending documents
- How to proofread your work
- The importance of document presentation and proofreading
Learning Topics
- How to improve your confidence at work
- How you can benefit from improved confidence
- What to expect when your confidence improves
- Signs of lack of self-confidence
Learning Topics
- Improve your typing skills beyond a beginner level
- Tips on how to improve your touch typing
- How to effectively transcribe audio
- Mistakes and errors to avoid
Learning Topics
- Why meetings are important and what they achieve
- How you should plan and organise a meeting
- Things to avoid
- The aspects of a successful meeting and how to execute them
Learning Topics
- What Microsoft Outlook is
- What Microsoft Outlook can do
- How it can help you in the workplace
- Simple tricks on how to get the most out of Microsoft Outlook
Learning Topics
- How to understand the basics of Excel
- How to easily navigate Excel
- Why Excel is a useful tool for making spreadsheets
- Simple ideas for troubleshooting
Learning Topics
- Understand the basics of PowerPoint
- How to navigate PowerPoint
- How you can benefit from using PowerPoint
- Troubleshooting guide for basic PowerPoint
Learning Topics
- How to successfully use Microsoft Word
- How to navigate around Microsoft Word
- Tips and tricks for easy use or shortcuts
- Troubleshoot simple problems in Word
Learning Topics
- The importance of customer communication skills
- The most important reception skills
- How to handle tasks at work efficiently
- What to avoid and how to overcome problems with customer communication
Module 2 : Diary Management
Topics
- Manage dates and times and schedule appointments
- Be creative and develop a user-friendly diary system
- Use our tips and implement them into the role of a PA
- How to plan ahead successfully
- Execute a sound business plan to support your manager
- Sounds simple - managers have complex diaries
- Can include 80% of the job role for a PA
- Effective diary management = successful time management and better utilisation of the work day
- All meeting requests should go to the PA to note it down
Important Attribute - FLEXIBILITY
- Should never schedule a recurring meeting more than 6 months in advance
- Some meetings might be able to be done over the phone or on a video chat meeting.
NEVER DELETE RECURRING MEETINGS
- Always change the date if needed
- Before booking a meeting, have a look at what your boss is doing so they aren't in difficult meetings constantly.
Activity 1 - Practicing Diary Management
- Try practicing making a schedule for my own life
- Ensure to allow for mishaps - eg. traffic, long meetings
- Colour code the schedule for meetings, reading time, answering emails and lunch plans.
- Having 2 screens can be helpful so you can see the managers diary at all times whilst working on the other screen.
- If not, print it out, leaving room to make ammendments if necessary.
Events I will need to plan
- Appointments/commitments/meetings
- Lunch breaks
- Other planned activities or excursions
- Personal tasks
Details of the diary - Things to include for each calendar entry
- Date, time, location
- Attendees
- Agenda
- Supporting papers
- The objective and nature of every meeting
When adding meetings with other people
- Ensure when and where the other person is wanting to have a meeting
- Without this info, it is not professional
Folders
- Buy an expanding folder box with dividers in it.
- Keep it organised - every divider for each day of the month
- Ensure whatever goes in each divider is organised by when it is needed
- At the end of each day - provide the next days paperwork in clear plastic wallets with a copy of the diary.
- You can also number the meetings in the folder for clarity.
Tips
- Note your bosses habits - eg. when do they prefer to have meetinga or when they like to go for lunch.
- If meeting keeps getting cancelled, opt for a phone meeting or schedule it less often.
- Assign colours for activities and appointments for easy access and clarity.
- Allow time for getting to meetings, traffic, urgency. Don't just add a meeting when you see a gap in the diary
- Ensure the manager has time for their own work, not just meetings
- When you get notice of a new meeting or activity, note it down immediately.
- Read the diary for the next day to stay ahead of what is going on.
- Keep a to do list to ensure complete tasks are crossed off and incomplete tasks are identified
Diary Management Strategies
- Talk to boss about the diary to make sure it is okay - check about cancellations, and prepare to apologise to third parties regarding these cancellations.
- Find out the nature of each event or meeting to ensure the boss knows exactly what to expect.
- If you are booking a meeting over the phone, email them to finalise it, just to ensure you have everything correct in the diary.
- Prioritise customer satisfaction over smaller duties
- I must learn to differentiate between urgent and important
Make sure you plan to be able to work whilst travelling eg. bring laptop in the car.
Questions to ask before accepting a meeting request
- Is the meeting in person?
- Can they receive a briefing before the meeting
- Can the meeting be arranged for an earlier date, what time?
- Will your boss be there for the entire duration?
- How necessary is the meeting? Can it happen over video chat or a phone call?
Module 5 : Telephone skills as a PA
Module 5: Telephone Skills as a PA
- Customers often form an opinion (judgement) based on a single phonecall
5.1 Introduction
- Integral part of being a PA
- Starting point of every prospective deal
- Voice tone, response and communication over the phone are considered a reflection of the brand
5.2 Why phonecalls are considered lifelines for a business
- Customers prefer verbal contact with a business before transacting
- Online options are popular but talking to the company is still be preferred choice. Communication is the easiest and most effective way to conduct businesss
- PAs will often be required to attend to phone calls before transferring to the boss
- Often request information that they are unable to find online
- Phone skills can indicate professionalism and efficiency and thus that of the business
- New and existing customers
5.3 Important phone etiquette and skills
- Pick up within 3 rings
- Be calm and speak slowly with clarity
- Tell caller your identity and ask how you can help
- Sound sincere and interested over the phone
5.4 Evaluating length of calls
- Don't sound in a rush, give each person the attention they deserve
- Deal with their queries efficiently
- Don't chitchat
5.5 Additional phone etiquette tips
- Make sure the phone instrument is correctly positioned so the caller can here you clearly
- Insight and intuition
- Friendly, interested and reassuring
- A good attitude must be backed up with solid technical or product knowledge
- Respectful and formal at all times
- Modulate tone and volume of voice
- Avoid calling customers by their first names unless they ask you to, use their title
- Write down important information so you don't forget
- Always inform customers before placing them on hold and try not to leave them on hld for too long
- If the boss is unavailable take a message and repeat it back
- If the customer is upset, be patient, write down important information and direct them appropriately
5.6 Tips on making business phone calls
- Identify yourself and the company
- Be discreet while making phonecalls that involve confidential information
- Avoid leaving long messages. Keep them concise and to the point to avoid misunderstanding
5.7 Additional training
- Can ask for on the job training
Activity
Greet the customer in a friendly and welcoming tone
Say goodbye and note to the customer if they need to call back again for any advice or assistance that they are welcome to contact you again.
Module 6 : Hotel and travel arrangements
Module 6: Hotel and travel arangements
6.1 Introduction
- Discussing business proposals and transactions, factory/site visits, networking and building relationships
- Booking hotels and making travel arrangements is an integral part of a PAs job
- Business travel is associated with an amount of stress
- Planned itineries, be prepared for meetings
6.2 Create your itinerary
- Find out exactly what your manager is planning for the trip
- Components: objective of meeting, planned vsits, proximity to hotel/facilities, car rentals
- FLEXIBILITY
- Allows for last minute changes if necessary
- Hotel selection, transport choices, dining options
TIPS
- Book 2/3 appointments well in advance with space for commuting and preparation for the next meeting
- Before booking, check with boss on preferences, timings etc
- Check passports and visas 1 month in advance
- Itinerary should include details about: flights, dates, car rentals, hotel bookings, confirmation numbers and phone contacts.
- Include travel agents phone number, hotel address and meeting addresses
- Foreign destinations - include details on dress code, tipping advice, etiquette tips etc
6.3 Communication
- Think about how your manager will communicate on the trip
- You may wish to upgrade their phone plan to get good rates on international calls, data usage and texts
- You could use a temporary sim card - the phone will need to be unlocked for different regions
- The old fashioned option is a prepaid phone card
6.4 Check the times
- Check updates and changes in travel
- Check regularly
- In the event of poor weather, check for delays and cancellations
6.5 Buy refundable tickets
- Business travel always contains a level of unpredicability
- Meetings might be postponed or cancelled from either side due to scheduling conflicts
- Last minute cancellations can result in a loss so booking refundable tickets reduces that
- Also have the option of rescheduling with no hassle
6.6 Cross that checklist
- Simple yet powerful tool
- Create a list for everything: travel documents, meeting requirements, clothes, chargers etc
- Remind your boss of the list
- Have a separate list for business and leisure
CARRY ON LUGGAGE
- Don't have to check a suitcase
- Minimises risk of lost luggage
- Ensures you have everything immediately when you land
TRAVEL DOCUMENTS
- Passport, ID, VISA, business papers and documents, medical certificates, wallet, insurance, driving liscence and booking confirmation
- If your boss travels without you, remind them to check everything against your list
6.7 Transport Requirements
AIRLINE BOOKINGS
- Book flights according to their preferences
---- Morning, evening or overnight. Specific airline. Seat preference (window or aisle).
- Note down preferences for senior management and store them for future reference.
- Once you have made the bookings, send itinerary to person to check they are good with it
- Large cities tend to have more than 1 airport, make sure they know which airport it is and leave commute
CAR RENTALS
- Public vs private transport
- Boss will have a preference and it may depend on where they are going
- Taxi, rent a car, hire a driver
- Check reviews on companies
- Check preference on car - may depend on budget, length of time in car, boss preference
- Measure up quality and reliability vs price
- Make sure your boss knows the make/model of car as well as drop off and pick up times and locations along with confirmation numbers
6.8 Hotel booking
- Compare prices to find deals
- Hotel booking sites normalls offer better prices than booking direct
- Book a refundable room incase you have to cancel
- Choice of hotel and room type might be dictated by company - could vary depending on seniority of traveller
- Familiarise yourself with boss' personal preferences
6.9 Travel expense evaluation and tracking
- Business travel has a budget allocated
- Expense will depend on company policy
- Follow company policy while incorporating boss' preferences
Module summary
The underlying objective of business travel is to maximise the time spent on travel while achieving business goals at the same time. A well-planned trip can help your boss focus on tasks without worrying about the travel arrangements.
Your boss will need you to help with booking hotels and making business travel arrangements. A personal assistant performs the duty of organising hotels, travel, tickets and more.
You have learned the basics regarding how to plan a successful business trip. A checklist can help plan ahead of time. Successful business travel planning involves preparing a detailed itinerary, checking travel documentation, booking airlines/trains and car rentals and making suitable hotel bookings.
Business travel often involves changes and amendments in the schedule. It's preferable to plan in a way that allows you to incorporate last minute changes.
Module 7 : Filing systems
Module 7: Filing systems
A secretary or personal assistant will have to keep track of every record, account, employee profile and business event. An accurate filing system will make your job much easier and well stored archive that is easy to use will make accounting tasks much easier to execute.
- You may be expected to create and maintain a successful, readable and easy to navigate filing system.
- Files and records that are stored on the computer are called "soft copies". In actual paperback files are called "hard copies".
- Essential goal of a good filing system is to provide easy access to information.
- A good filing system leads to increased staff efficiency and productivity.
- An updated filing system makes it easier to access unpaid invoices, pending bills and open contracts.
- Never delete past records.
- You may wish to store them alphabetically or data-wise.
Create your catagories
- Possible catagory titles are Finances, employees, accounts, projects, meetings and miscellaneous.
- All members of the office should know how to use the filing system.
You should have sub-catagories for each. For example, the finance section can be split into Personal, checking accounts, company accounts, pay-roll, budgets, costs.
Colour coding
- Choose a different colour for each major catagory in your filing system.
- Colour coding is a simple yet effective way to keep track of your filing system.
Making labels
- Label each file. File alphabetically.
- The equipment and storage space should correspond to the number of records. Ideally storage equipment must be expandable to accomodate additional records. Store in an up right sliding drawer. Common files that you will come accross:
- Administrative files - documents of internal admin that circulate within the office.
- Organisational files - documents that label the relationships between your office and other external offices.
- Programmes - Staff activities or programmes.
- Case files - Staff files, agendas, reports, specific events etc.
Many of these files will fall into the same catagory. The size of the complexity of the filing system will depend upon operations, nature and size of the business.
Correspondance files can consist of incoming and outgoing letters, emails and phone calls. File them in chronological order after they have been dealth with. Filing them by date will be easier.
You can back up files but must name them as duplicates so you are aware that they are duplicates.
Emails can be printed and places in a paper filing system.
Module 1: Introduction to the PA Course
Intro
Activity 1
- Must be organised, able to plan (and shift plans/schedules) and understand priorities.
- Attention to detail
- Communication skills is key - bosses, subordinates, colleagues, externall clients, etc.
- Confident and willing to step in for boss in meetings, willing to contribute ideas and reasonings to decision making.
- Undertake tasks required for helping boss - secretarial/admin jobs.
Module 3 : Business Letter Writing
Businness letters
evidennce of transaction
to promote goodwill
provide information about offered product or services
to thank cusomers or suppliers
to forge new clients or to reinforce existing ones
Writing letter:
Use professional header (companys logos or Managers name)
use standard formats and templates for business writing, the most common is in blocks or block style, text should be single spaced with double spaces between paragraphs.
margins are set to 1inch on each side
start with date month year
include senders email or address
ensure you use receipents full name and title
Main content should be clear concise and objectively worded. Establish a connection by using professional tone
Incorporate a closing call to action towards the end of the letter
sign the letter with black or blue
The call to action should be actively worded and minimise the use of ambiguous phraseology
Module 4 : Composing faxes, memorandums and emails
Module 4 - Composing faxes, memorandums and emails
Faxing
- Fax is less common these days but is useful to know how to still send faxes.
- Offices commonly use internet faxing.
- Intonationally communication technique
- internet faxing is used solely by internet connection
- You can send multpile faxes at the same time
Memorandums
- Record specific terms that may include transactions, contracts or policy
- Usually created at the draft stage and are populary refered to as the memos.
- Memos are informal pieces of communication designed to share information
- Text to be kept to a minimum
- Typically more formal than emails, but less formal than letters.
- Tips on writing memorandums - always include a descriptive message of proposed policies. Keep language simple and informative.
- Keep private and personal emails seperate to avoid confusion.
Module 12 : Work Planning
WORKPLANS:
Work plans may often be presented in the form of a proposal as they may not always go according to plan. Budgets need to be approved and other work can be conditional, depending on several factors, including the number of participants in the project. Is the project you are planning going to include a group of people, your boss or just yourself?
- Planning helps define goals for the organisation and also helps define the steps that will help achieve the goals.
- Organisational success is achieved by investing time and effort in planning. Planning helps identify constraints and probable limiting factors that may arise along the way. Thus, work planning helps minimise the risk of uncertainties.
- Work planning helps establish realistic goals, conserves resources and maximises team effort.
Work planning offers multiple benefits:
- You are able to understand what you can achieve realistically in a given time frame
- Planning helps avoid taking on too many tasks that could disrupt your concentration and waste your time
- You can look forward to an increase in the level of accomplishment and work towards your goals
- Planning helps you achieve a work-life balance that leaves you with more time for yourself.
work plans are not restricted only to budgets or schedules.
Dealing with partial information:
Although we would ideally like to plan with full knowledge of data, this does not always happen. As a personal assistant, you may sometimes be in possession of only partial information. For example, you may be aware of a meeting in the office the next day, but some members may have not yet confirmed their attendance.
Identifying and recognising contradictory information:
Information may not always be present in a cohesive and flowing format. For example, your boss may be scheduled to meet with a client the following day, but you may receive a message to the contrary from them.
A PA's job often involves sifting through contradictory pieces of information and finding out the true facts.
Recognising unreliable information and avoiding basing assumptions on it:
For example, a supplier may not be able to guarantee delivery of raw materials due to bad weather. In this event, you may not be able to plan to update your inventory due to the unreliability of delivery dates.
Using intuition and past experience to make decisions:
A PA's job involves planning the day or tasks based on his/her intuitive knowledge of colleagues, bosses and customers. Your personal knowledge of habits, inclinations and preferences help you plan tasks, meetings and processes.
Examining alternate courses of action in the event of a change in schedule:
A successful PA always has a 'plan B' in case the original plan cannot be executed. Shifting schedules, changing appointments and a conflict of goals can sometimes require the implementation of alternate plans.
Planning smaller administrative tasks:
Many times, you may have to oversee the execution of smaller tasks while keeping in mind the bigger picture. Administrative tasks such as responding to client correspondence and filing invoices may need to be done on a daily basis. These tasks may not relate directly to a project or task, but they are important.
Planning your work involves managing a range of tasks that are associated with different levels of responsibility and importance.
Work at the office often follows its own ebb and flow; at times, you may be extremely busy while other days may be much less busy. Quiet periods do not imply that there are no tasks to be done; it simply means that there are no immediate looming deadlines.
Plan your list of tasks by creating a master list followed by weekly and monthly lists. Work planning can be done through formal as well as informal means. For example, Excel sheets, Gantt charts, etc. represent formal planning tools. Informal planning can be done by using a good old diary. You can plan time to check emails and messages. It's not necessary to respond to each email at this time; you can read them through - this will aid in further planning your day. As far as possible, use pencil to make diary entries; this way they can be rubbed out if there are any changes.
In fact, it's also advisable to schedule time-slots for returning or making phone calls. It's best not to make them in a random way as and when you remember.
- Opt to write complete lists. Avoid depending on post-it notes
- Make out work related as well as personal lists. This will help you get an idea of the overall picture and you are better placed to strike a balance between the two
- Update your list regularly and cross off completed tasks
- Mark a star next to complex tasks; this will help you allocate time more efficiently. You will also experience a feeling of accomplishment once you have completed the task
Module 13 : Document Presentation and Proofreading
File naming: systematic, logically, used by all. Unique. Indicative of content. Use dates. Receipts name on file. Incl. date.
Module 17: How to use Microsoft Outlook
Here is a list of some of the most useful shortcuts (there are 247 in total).
- Ctrl + R = reply to email
- Alt + R = reply to all in email or switch to work week calendar view
- Alt + W = forward an email or switch to weekly calendar view
- Ctrl + M = F9 to send or receive an email
- Alt + S = Send an email
- Ctrl + G = Open go to date dialog and jump to any date in calendar
Module 9 : Invoicing/Petty cash
9: INVOICING/PETTY CASH
An invoice is a bill or tab used as a commercial document issued from a seller to a buyer.
useful for account and tax purposes
RECIEPT - Issued once payment made
INVOICE - Issued once product trf to buyer
Module 10 : Customer Care
Excellent customer care is always at the heart of any successful business.
Positive communication: Our item is going to be back in stock in one month
The ability to understand someone who is different from us is known as Empathy
Module 11 : Customer Complaints Management
COMPLAINTS:
With the advent of social media, negative publicity can spread like wildfire and end up damaging your brand image.
If left unresolved and neglected: a) The problem is likely to linger on in internal processes and b) The problem is likely to get further perpetuated and will generate additional complaints in the long run. Managing customer complaints in an efficient manner helps retain customers and helps nip a potential problem in the bud.
According to a research into customer behaviour from RightNow, customers do not usually switch brands due to pricing or quality issues, but due to poor customer service.
4 broad avenues commonly used to communicate customer complaints - in person, email or internet, telephone or postal service.
key steps to follow when handling a complaints:
1. thank customers for communicating
they have invested there time to tell you.
2. always apologise
you are apologising on the company behalf.
allow them to give you every peice of infomation. allow them time to calm down by giving them time to talk.
if they are abusice ask them to refrain from using bad language.
3. Correct all mistakes.
make sure we are on the same page. ask what they would expect to be done and explain the options. explain the time frames, costs if any. and follow up commucations are clear.
4. learn from complaints.
Inform customers that their constructive criticism helped you move forward as a company. When your manager keeps hearing of your ideas to use complaints to improve work processes, they will be more inclined to place trust in you.
It could cost 5 times more to get a new customer than retaining an old one. So it is in your interests as a PA to adopt a helpful and efficient attitude towards customer complaints.
Things to avoid
- Never laugh at a customer, no matter what they say to you and never argue back.
- Don't treat one complaint as something less serious than another. Regardless of seriousness, all complaints should be treated with thoughtful care and attention.
This is a sample checklist of what you could consider including in your complaint procedure checklist.
- Use an identified complaint personnel who represents the company. In smaller companies, this is likely to be your job as a PA and it would be handled by a team in larger corporations.
- Use somebody who is allocated to handle and investigate each complaint; the investigator should be suitable to handle senior decisions and resolve issues with the full authority of your manager. If possible, you should have had no prior involvement in the complaint you are investigating.
- All arrangements should be in place to communicate with complaints by phone, letters and email. The company can even have a designated complaints handling address for your emails so they never get lost. This should be quoted in the complaints procedure.
- Information on your website should include where to find your contact details; have everything marked clearly.
Make a checklist to ensure you also have a written procedure of how customers can complain. This can be presented any way as long as it looks professional. You should have this for internal staff also so they know how to handle complaints in the correct way.
- A complaint leaflet should let people know that they can be made by phone, in person, post or by email.
- Give full contact details so people know how to use them when needing to contact you.
- Keep records of all complaints made against the company. They should all be archived and dealt with in quick succession.
- Thank the customer and tell them when they can expect a reply from you in regard to dealing with their complaint. Give your name and let them know that you are the person dealing with the complaint.
- Set a reasonable time limit for dealing with complaints; how long will it realistically take to have them dealt with?
- Allow enough time for clients to respond to you before closing any complaints procedures on certain cases. You must also deal with anonymous complaints.
- Ensure all complaints will be handled by the correct individual who is qualified to do so.
- Each individual should receive:
- Assistance in enabling them to understand the complaints procedure.
- Advice on where to obtain any help.
- Have a display in the reception or visitor's area on how to make complaints if necessary.
- State that complaints should only be made under specific circumstances.
- Beginning with a written or verbal consent.
- Can the person complaining do so without specific health risks due to medical conditions?
- Is the representative acting in the user's best interests?
- Is the complaint 100% true?
- Offer other means for people with impaired sight or hearing to make complaints if necessary.
- State that you will keep the complainant informed throughout the process of investigation.
- State how long they should wait for the procedure to be dealt with, this will vary depending on seriousness of the case. State this in working days.
- Tell them the maximum time within which the complaint can be expected to be resolved.
- Co-operate with your customer and work out the best possible solution to resolve
-
Module Summary
The ability of a company to handle customer complaints can determine its potential success. Handling customer complaints requires tact, diplomacy, interest and enthusiasm. A complaint can help a business refine and improve its services and products and counts as reliable feedback for further improvement.
A good customer complaints procedure outlines how to deal with complaints, respond quickly and be respectful of a customer's thoughts, needs and concerns.
Failing to deal with customer complaints will be bad for the future of your organisation.
Module 8 : Time Management Skills
Time Management is the most important part of PA
1. Limited and finite resource
2. Effectiveness without feeling stressed and exhausted
3. Improved decision-making
4. Prioritise tasks and identify time-wasters
5. Reduced stress levels and higher quality output of work
6. Discipline
Discipline, prioritization and focus
So, if you are already overwhelmed at work and your boss wants more, here are a few tips to say no politely:
Explain that you are obliged to say no due to the fact you have to prioritise your tasks. Communicate to the boss that you don't really wish to decline the task, but you are simply trying to be realistic.
Try to resolve the requester's problem while saying 'no'. For example, you can ask if you can work on the project the following day or you can ask if you can delegate it to so-and-so. Always make it a point to say no in person rather than by email. Speaking face-to-face allows the boss to listen to your tone of voice; emails can be misconstrued.
Module 19 : How to use PowerPoint (Basics)
to undo it simply press CTRL + Z or optionally choose a blank theme if you wish to restart again.
Press CTRL and M to start a new slide.
F5 to begin a slide show.
Microsoft PowerPoint is a very useful tool to use when creating presentations that involve the use of media, text and slide screens. It allows you to create professional and attractive presentations that are often used during conferences, meetings and seminars, and much more.
PowerPoint offers users a versatile combination of features that include drawing, imaging, outlining, word processing and presentation all in one package.
In this module you will learn:
- Understand the basics of PowerPoint
- How to navigate PowerPoint
- How you can benefit from using PowerPoint
- Troubleshooting guide for basic PowerPoint
- Simple tricks and tips to get you started
19.1 Getting started
Microsoft PowerPoint is one of the most popular presentation software applications, and with good reason too.
Why is it important to be familiar with using PowerPoint and what are the associated benefits? What are the innovative features of the recent PowerPoint versions?
- Creating professional presentations is no longer the prerogative of qualified computer professionals alone. The layman is able to use the features of PowerPoint and manipulate colour, shapes and text to create excellent presentations. New features like the 'eyedropper' allow users to select the colour combination that the cursor is pointing at. It will also store the RGB colour combination for later use. In addition, recent versions of PowerPoint come with improved charts, designs and layouts that can be effectively used to create better presentations.
- In the latest version of PowerPoint, PowerPoint 13, you can search and insert videos as well as images directly into your slide quicker than before. Earlier, resizing and formatting images to fit into slides used to be a time-consuming task. This is no longer so; you can use the new feature called 'smart guides' that consists of little red arrows that help you position objects in the slide by adjusting distances and alignment.
- Improved control during presentations: The 'presenter view' feature offers users enhanced control during presentations. You are able to navigate movement between slides more easily and quickly compared to earlier versions of PowerPoint. Moreover, if you use a tablet that allows the usage of digital ink, you can even take notes directly onto slides. You can also use your fingers to zoom in and out of slides.
- Improved audience outreach: The new PowerPoint 2013 allows presenters to use the new feature called 'presenter online'. This allows participants to view the presentation in their browsers online as well as to download the presentation (earlier versions had the 'broadcasting' feature which allowed only viewing).
Start by choosing between a blank presentation and a template. When you start a new PowerPoint file it will give you the option of either a blank presentation or ready-made template. A blank presentation will let you create your own preferred styles. This is good if you have the time to do so; a template can give you a uniform style that saves time, but may not offer the same level of customisability.
You can edit aspects of your template, so choose something that suits what you want. One can also apply themes to projects at a later time, once you have added content. Click on the 'design' tab and select your theme. This selected theme will then be applied to the project, to undo it simply press CTRL + Z or optionally choose a blank theme if you wish to restart again.
You are able to access templates from 'File' tab. Click 'New' and then browse all templates that are available. You can also download additional templates from online sources.
19.2 Creating Title Slides
 A title is the point in a presentation where you first connect to your audience.
This should be easy to read and will give a brief overview of your topic and presentation. Some presenters will include the name or group name in or near the title.
Add new slides for content. Press CTRL and M to start a new slide. One blank slide will be added after the slide you are currently on. The slide will contain a title and text box. One can use them to insert objects onto the slide using the Insert tab.
Some important information that your title should contain includes: The title and subtitle (optional), your name, contact details of your organisation and the company logo.
When you add text to a box, simply click and drag to make whatever size one would like. Then adjust later by grabbing one corner with the cursor, then click and drag it again. It is possible to click on any text box and type to begin adding text to a presentation. Format text in the same way you would with Microsoft Word, formatting options are available in the Home tab.
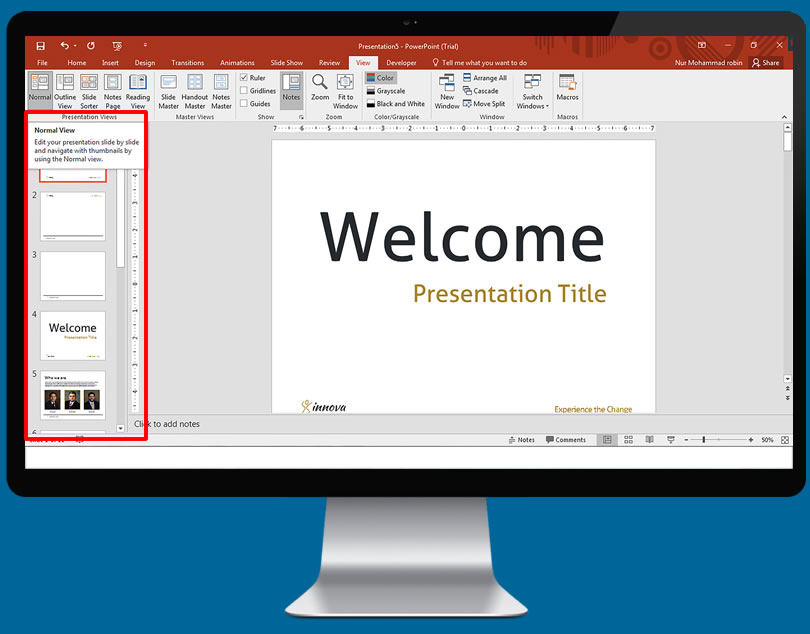
How to Navigate Presentations
Use the frame on the left-hand side window to scroll through slides. Click any of them and it will open the slide so it can be edited. Click the outline tab to see a basic outline of your current presentation. Each slide is labelled by the title.
Navigating Presentations
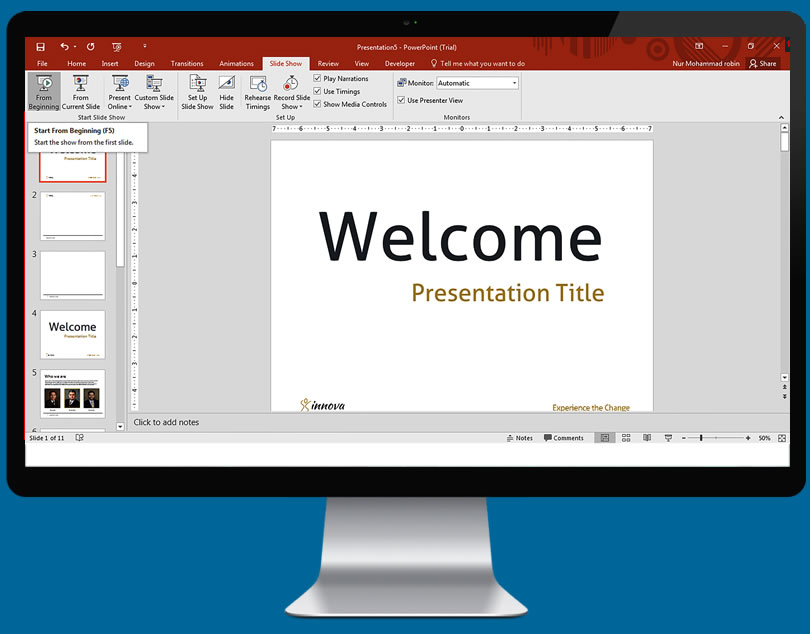
Previewing your presentation
One can get a basic feel quite quickly for your presentation by pressing F5 to begin a slide show. Click the mouse to advance slides, then use the preview slide show to find out how long the presentation is, how well your information flows, etc.
Previewing a Presentation
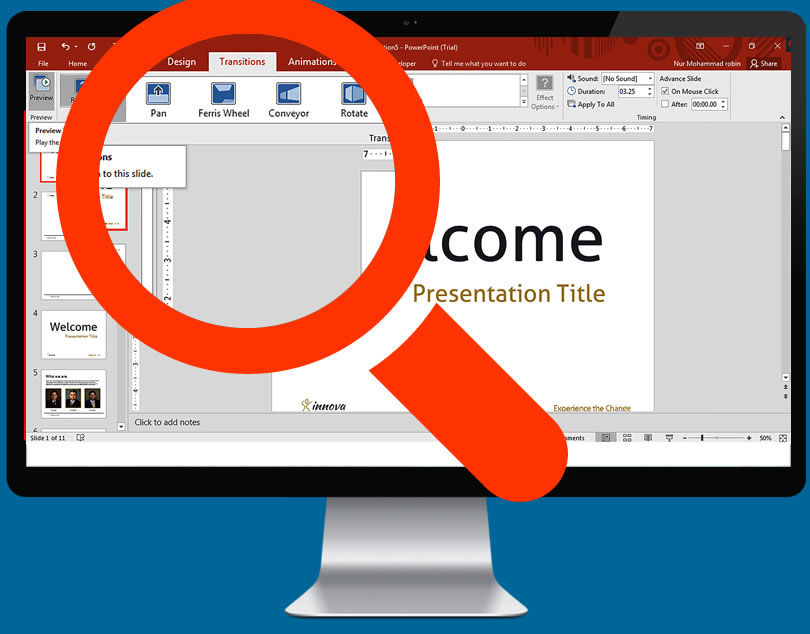
Adding Transition between Slides
Once you have content in your slides, you can start adding effects to help make your presentation more attractive for the audience. Select any slide then click the Transitions tab. You will then see a list of common transitions, click the arrow at the end of the list to open a full list of available transitions.
When one picks a transition, the choice may affect how the slide appears in the presentation. For example, if you add a transition to Slide 2, it will affect how Slide 1 will transition into Slide 2. You are able to see previews in the slide editing window when you click each transition.
It is advisable not to use excessive transitioning between slides as it may prove confusing for the audience to follow.
Transitioning Between Slides
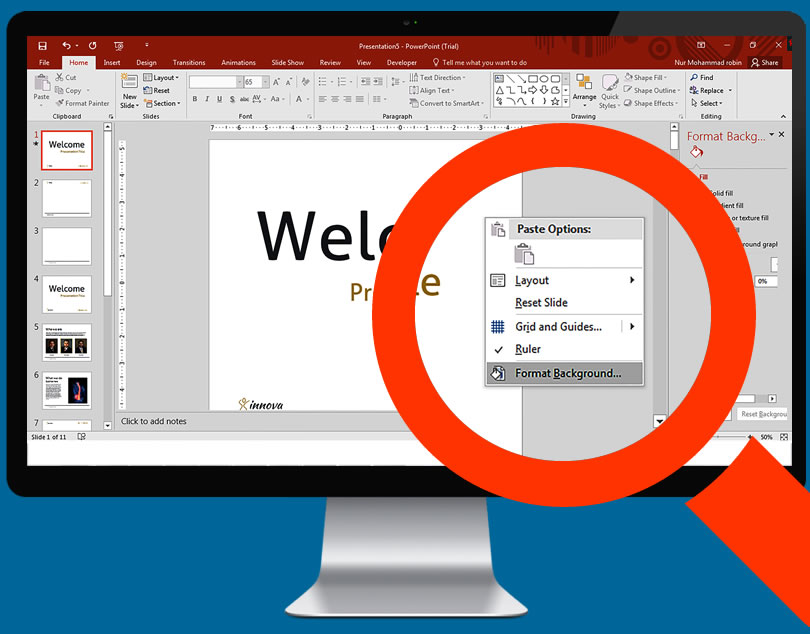
Adding Backgrounds
A plain white background is always going to look uninspired; if the presentation is on a plain background, then they will not be fully absorbed by your work. By using simple subtle backgrounds, you can add a level of innovation to each project that you create. Creative and well-designed presentations stand out in audience memory.
Right-click on a blank portion of the slide and select Format Background, or you can click Design tab - click the arrow icon next to the Background setting.
One can choose a solid colour, gradient fill, picture background or pattern fill. Selecting each one will give you a display of several options like picture location, colour, gradient settings, etc. Experiment with them until you have found the background that fits the needs of your desire.
As default, background will only be applied to the slide you are currently on. You must click 'Apply to All' for the background to apply to every slide in the presentation. Make sure your text is readable and compatible with the chosen background.
Adding a Background
Add Images
Add pictures, diagrams or other visual material to help your audience grasp what it is you are trying to convey. Images break up the text and give the reader a little variety when they are paying attention to your presentation.
Click the Insert tab to reveal a large number of options that can help you insert objects. Click the 'PICTURE' button and insert a picture file from your computer. It is also possible to click Photo Album to add an entire album's worth of photos into your slide presentation.
Use your Charts button to insert easy-to-read charts that can help the audience understand your text and data. Once you have chosen the chart type, Excel will open and let you enter data or copy from a spreadsheet. You can use the shapes button to insert pre-made shapes or create your own. These shapes can outline important text or create arrows or other visual indicators.
The audience should not feel distracted from your main message by an overdose of designs and colours. The text and content should be clear and readable.
Adding Images

19.3 Design Tips to Create Stunning Presentations in PowerPoint
- Try to avoid using the standard, stock templates that come with the PowerPoint software. A different and innovative design template is the best starting point for a good presentation.
- Do not insert too many text lines into every slide. Keep in mind that the audience has to read your points while processing your spoken information at the same time. Limit the text lines to 6 at most per slide. Overly lengthy content on each slide will bore your audience and make them lose interest in the presentation.
- Share only one idea per slide. The presentation must act as an effective aid to your ideas and suggestions. Avoid inserting too many bullet points into one slide. Sharing one idea per slide helps develop the idea and explain its importance to the audience.
- Choose your font type based on legibility and clarity rather than appearance alone. It's best to stick to a simple, traditional typeface so that your audience is able to read the content easily. Use strong contrast between the background and text colour to improve clarity. For example, if you are using a light background, choose a dark colour for the fonts so that the text stands out. Keep font sizes standard instead of making them too big or too small.
- Use a single colour to highlight important words and phrases in your presentation. Avoid using more than 5 colours in one slide. A harmonious palette of colours can help enhance your presentation and draw the reader's eyes to important content.
- Speakers load a new slide and wait for it to come on before they explain it. This pattern can prove extremely boring for the audience if continued throughout the presentation. To engage the audience with a more contiguous flow, change slides even when you are in mid-sentence. Keep changing slides to keep the pace going; you should only ensure that each slide should not contain too much information.
- You can also try using a little light music to accompany your slides. Just click on INSERT->AUDIO->AUDIO-in-my-PC and then select the music file that you want. Keep the music soft and unobtrusive.
Activity 1 - Practise Creating Title Slides in Microsoft PowerPoint
Estimated time: 10-15 minutes
You just learned about some of the features in Microsoft PowerPoint, which is another program within Microsoft Office. You learned how to utilise the program to create professional presentations, which could include text and slide screens.
Take some time to review what you have learned, then locate a version of PowerPoint for practice. Next, open a new presentation and try creating title slides. How do you create a new title slide? Are there any tips or formatting tricks you should consider when adding text to your slides?
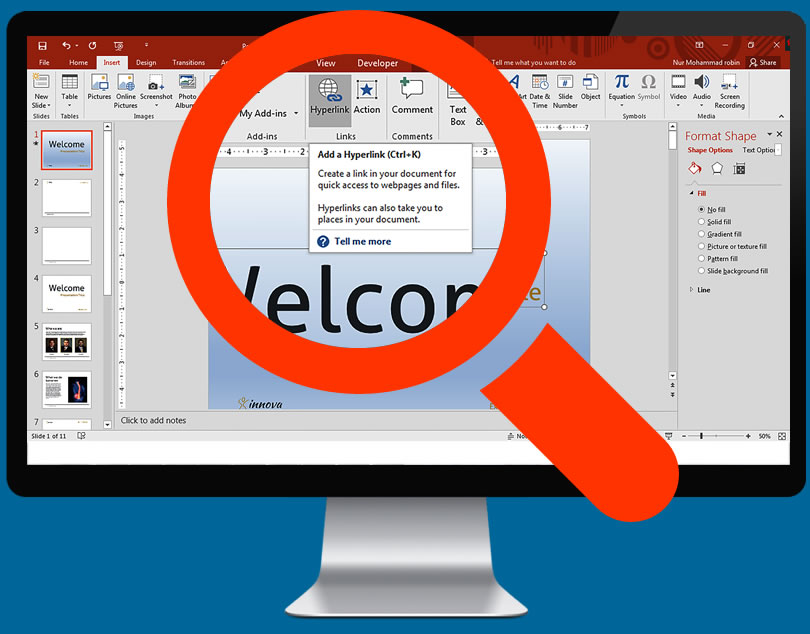
19.4 Adding Links
 You can add links to slides so people can access email addresses or slides quickly.
This is always useful if you are distributing a presentation or want people to easily view pages that you have used for reference.
To add links, all you need to do is place the cursor in the text box and click 'hyperlink' button on the Insert tab. Choose to link a file on your computer, web address or email. You can even refer to a different slide in the same presentation.
To embed a video - You can do this when you are inserting reports or video files that relate to your presentation. Video files will automatically play when the slide appears. Simply click the video button on the Insert tab, browse your computer video files and select the one you need.
Adding links
19.5 A Note on Font Size
 Using small fonts will make it hard to read, so opt for a larger size that doesn't entail flamboyant symbols.
Be consistent and subtle while maintaining legibility and clarity. Using minimal colour or stylistic accent to make your slide show stand out will avoid looking too garish. Use a template as a guide if you are not sure what to do.
Always proofread your work and check for grammatical errors. Other people will notice your mistakes much sooner than you do and glaring omissions could lower your credibility. Request a colleague to proofread your work before you actually present it to your audience. Timing, talking points and accurate statistics or data will back up your points that you are trying to put out there. Don't read off the slides as you are presenting them to the audience as this is a redundant exercise - the text is already in front of them to read. Your talk should give them something extra that is not on the slide.
19.6 Properly Align all Objects
Properly align objects in your slides so that they appear harmonious.
You can try to do this manually, but that can prove challenging. You need everything to be in the middle of the slide.
Tips to align multiple objects:
- Select objects by holding down Shift and click on all.
- Then select Arrange in the options bar and choose Align or Distribute.
- Then all you have to do is choose the alignment you prefer.
Activity 2 - Enhancing your PowerPoint Slides
Estimated time: 10-15 minutes
In the previous activity, you learned how to create new title slides within PowerPoint. Hopefully, you practised working with some of the formatting tricks that are built within Microsoft PowerPoint and learned the ways in which you can make a professional presentation.
In this next activity, you will continue your practice with PowerPoint but will focus on adding features to your presentations. On your computer, open PowerPoint once again. You should have a saved slide, which you can use again for this project. Now, practise adding images and some of the other design tips you have learned in this module. How did you go about doing this?
19.7 Formatting the Quick Access Tool Bar

You can use the Quick Access Toolbar to unlock features that are used the most.
Including ones that are usually hard to find. There are a handful of features that we have mentioned that you can use to build better content in PowerPoint. This will result in quicker creation of aesthetic and informative presentations.
Format the Quick Access Toolbar with useful, but hidden, features.
The quick access toolbar is a place to put your most frequently used features (and features that are buried in the menus). There are a handful of features that I think are essential to building better content in PowerPoint. You might not even know that some of these features exist. So why not pull them front and centre for easy access?
Take a Quick Recap Test
Well done ! You passed.

You answered
5 of 6 questions correctly
Your score: 83.33%
19.8 Trouble with Fonts and Commands?
 There could be one plain and simple reason.
You may be experiencing incompatibility between different versions of PowerPoint. This could be at the root cause of problems associated with fonts and commands.
Use the inbuilt compatibility checker to see where you stand. PowerPoint 2013, 2010 and 2007 all use the same types of files. They use the same media plug-ins and generally won't have too many issues between them. Microsoft website has an FAQ section for all other error messages to help you troubleshoot.
Font size is a commonly experienced problem in preparing slides. This could occur if you are trying to use a Mac and PC. You can easily fix this by making text boxes large enough to accommodate any change in size of font.
Assignment
How to use PowerPoint (Basics)
Time: 30+ minutes
Hopefully, you took in as much of the information in this 19th module as possible. To find out how well you have done, complete the following worksheet.
Download the worksheet below and complete.
Module Summary
Microsoft PowerPoint can be used to create outstanding presentations for audiences worldwide. PowerPoint presentations breathe life to budgeting sessions, planning and yearly review meetings. The availability of designs, colours, layouts, font types and sizes make PowerPoint the ideal choice for users.
The inbuilt flexibility and versatility make PowerPoint one of the most popular presentation tools. New users can learn the ropes easily and you can create slides according to your preferences and inclination. The presentation of information in bits helps boil down ideas and suggestions into a series of innovatively prepared slides. Moreover, PowerPoint lends itself to enhancement by the process of embedding videos, images, charts and graphics, as well as audio in the slides.
The utility of PowerPoint is not restricted to workplaces and offices; it's an extremely useful learning tool in schools and colleges all over the world. The underlying purpose of using PowerPoint is to communicate your ideas effectively and stir audience interest in your subject.
Module 16: How to Organise Effective Meetings
Meetings are vital to the success of any business. Decisions are often made at meetings after analysing the inputs from various people.
Discussions across departments often lead to productive results.
Remind workers of organisational goals
good way to hold people accountable for their actions (share updates and accomplishments). Realise how each one's achievements contribute to a collective goal. Improve motivation.
Meetings are an integral part of the growth process of any organisation. Contrary to popular belief, meetings can be made to be effective and productive. However, inadequate planning can derail the primary purpose of the meeting and it can turn into an expensive and fruitless exercise.
As a PA, organising meetings will be part of your job role. Start with the objectives of the meeting and decide the list of attendees. The choice of venue plays an important role; ensure that you choose a venue of the right size and suitable location.
For in-house meetings, inform staff of the meeting beforehand and prepare a detailed agenda. Prepare a single page summary of the topics to be covered in the upcoming meeting.
Make sure that the timings, duration and objectives are circulated to attendees well before the commencement of the meeting. Keep the discussions relevant and useful while maintaining a friendly and interactive environment. Meetings can be extremely purposeful and productive depending on the way they are planned, conducted and organised.
Record and document all discussions, assignments, deadlines and projects covered in the meeting. PAs should ensure that copies are sent out to all attendees to help minimise the likelihood of misunderstandings and miscommunication.
Brainstorm (harness creativity of different individuals).
Account for diverse perspectives in the decission making process.
Resolve conflicts.
ASK BEFORE ORGANISING A MEETING:
What are the goals/purpose? Vague objectives tend to result in a waste of time (hard to decide who to invite, etc)
What information will be gained / exchanged? (targets)
Attendees?
Where?
For how long? should usually not exceede 60 min (if longer time, then schedule breaks)
Clarify your role before the meeting to avoid any confusion.
ROOM: enough space / layout?
Conveniently located for people expected to attend?
Parking?
Accessibility!
Venue should be aligned with the values and ethics of your company.
Seating arrangements!
All needed accessories and technology (pen, pads, projector, Wi-Fi, etc)
Refreshments / snaks / meals. Make sure to program breaks for these!
Inform attendees well in advance.
Get people to RSVP.
Circulate any changes or updates.
Prepare an agenda with all relevant info (and circulate):
full list of attendees
summary of discussions (list of topics to be covered)
how long the interval will be
what important decisions that need to be made (dates of pending problems that need fixing)
actions to be taken.
Go through a brief review of your agenda at the start of the meeting.
Record the meeting: MINUTES of the meeting.
Postmeeting. Send minutes out to participants (minimises the risk of misunderstandings and miscomunication).
Module 14 : Confidence Building Module
adopt behaviour and emotions that reflect who you are, work with your natural abilities not against them. so take on challenges that will suit your skill set
trust yourself, be realistic with capabilities
self confidence can help you make the most of your abilities and your experiences. You experience freedom from self doubt and improve chances of success.
ability to believe in yourself regardless of external stimuli.
stages to become more confidet;
1understand where low self confidence comes from
accept it
try new things
practise comms / problem solving
positive talk
Module 15: Typing and audio skills to proficient level or further if you already touch type/Audio transcribe
Typing and Audio skills
Module 15
Estimate time: 1 hour 15 minutes
Mistakes and errors to avoid.
Touch typing is a crucial skill.
Slow and
Performance and learing will be respected. Efficient typing
A high typing skill helps to improve productivity. A good rate of typing is 65 skills per minute. Every form of writing prepares you well in terms of spead and accuracy.
Touch typing is better method compared to the traditional practice.
If you type 20 minutes per minute, it may take one hour to complete one document.
This can often lead to laxes and
Typing learn by better concentration levels. If you have time you
Pat father of was the fastest writer with 150 words per minute.
Technically write without looking at the keyboard. There are designated keys for your fingers. People who are masters of typing state that without proper placement of fingers would not prepare you to increase efficicieny. Repeatition is the key to improving and doing better. Certain techniques you do over and over. Study and learn each technique until you are very good with it.
Will increase your overall alertness. You should be relaxed with your feet resting on the floor the rest should be. Stop looking down at the keyboard. It will lead to more mistakes but it will improve over time. Touch typing should be one of your key goals.
Learing at a beginner level involves printing letters. This will follow by an attempt to master. These the keys you can return to easily. Keys have functions that allow to perform certain short cuts.
At first only fractice as using your own words.
Touch typing takes little time to practice. The main objective is to try and type without looking at the keyboard. Estimated time is 10 to 15 minutes. This module covers another topic called touch typing.
Ensure your feet are placed flat on the floor. Audiocity transmission is the technique to transfer information. Modern technology has taken the place of transcription. However, there are flows of computer transcription. 165 transcription
Be able to type 65 words per minute. Helps to maximise time
- 60 words per minute means writing a whole page in under 10 minutes
- Elbows kept at a right angle
- avoid putting body pressure on wrists
- try not to look down at the keyboard
- KEEP PRACTISING
- learn where to potision each finger
- F and J are short but keys
Audio transcription is the process whereby you listen to audio text and transforms it into written text
- most businesses insist on saving audio texts for files stored
- use good quality headphones
- always clearly mark who is saying what when transferring it to text
- Non vabartim (type the initial conversation and leave out all pauses and stutters etc) or vabartim (record EXACTLY what the audio file plays like)
- make sure to proof read as typing to help save time
- take regular breaks to keep brain active and quick
- save recording in high resolution format
Touch typing helps your learning by using motor memory skills rather than sight. 80 percent technique, 10 percent accuracy, and 10 percent speed
Touch typing was invented in 1888 by Frank McGurrin.
Use good posture! (and good desk ergonomics) reduce stress and strain / improve alertness and help concentrate for longer.
Tips (touch typing):
Don't look at the keyboard.
home row: asd jkl
keep keystrokes light and avoid using excessive force.
Tips (transcribing techniques):
Good quality headphones.
Uniform and consistent format of transcription.
Clearly mark who is saying what.
Non-verbatim (leave out stutters and pauses)/ verbatim (adds a description of exactly what sequence things follow)
Take regular breaks.
Module 21 : Customer Communication and Reception Skills
represent your company competently and professionally.
Statements that should be avoided while responding to customers:
They are still at lunch
They are late for work.
Avoid giving personal information.
Avoid saying that you are unaware of their whereabouts.
Easier to just say that the requested person is not available right now. Take down the customer's contact details and make sure that you or the person in question returns the call.
TIPS for phone intereactions:
Positive / avoid showing irritation / speed / pitch / avoid complex and technical jargon / sincere and genuine / use name when you are able to
"please hold on"
Store numbers and addresses on a computer program or Rolodex.
Reception:
Greet every visitor with professionalism, warmth and courtesy. Everybody entering the premises should deserve a warm welcome. Visitors who have come over for a meeting may need to be directed to a comfortable waiting area or shown the way to conference rooms. Adopt an approachable and helpful attitude.
Module Summary
Regular, clear and courteous communication with customers is key to success in business. Communicating with customers helps built trust and establishes a relationship based on mutual loyalty. Customers are more likely to trust companies that have upheld customer service. As a PA, you are often the first point of contact between a customer and the company. Therefore, it becomes a priority to treat each customer well and establish clear lines of communication.
Communication with customers may be conducted over the phone, email or face-to-face. With each type of communication, the primary objective must be to listen to what the customer has to say. Thereafter, you must offer assistance and guidance in the best way possible. Customer feedback and communication is an excellent source of ideas for the company.
Effective reception skills play the role of competent marketing abilities. Your body language, appearance and demeanour play an integral role in making a customer feel comfortable and at ease. As a receptionist, you are the face of the company and the customer is liable to make their first impressions based on your treatment of them.
Frequently Asked Questions
To progress on to the next module of your course scroll to the bottom of the current module and press the “NEXT” button. This will take you directly to the following module.
Once you have completed the last module of the course please click on the button at the bottom of the module that says “START”. This will take you to the test.
The pass mark for the end of course test is 70%
Yes, you can re-take your test as many times as you need to.
No, once you have passed a test it is not possible to retake it.
When logging on to your course directly through our site you have lifetime access.
Click on the “My Profile” button at the top of any page on our site. This will take you to your profile page. Once there scroll down to the section headed “Edit Your Profile” and enter your new password.
Please click here to contact our student support team
If you would like to go back and view a completed module you can do this by clicking the “Course Modules” option from the side bar menu of your course. This will take you to a list of the modules contained within your course. Simply select the module you wish to study again.
Please click here to find out how to save your course modules as PDF files
Worksheets
Module 1: Introduction to the PA Course
Module 1: Introduction to the PA Course
Module 3 : Business Letter Writing
Module 3 : Business Letter Writing
Module 4 : Composing faxes, memorandums and emails
Module 4 : Composing faxes, memorandums and emails
Module 5 : Telephone skills as a PA
Module 5 : Telephone skills as a PA
Module 6 : Hotel and travel arrangements
Module 6 : Hotel and travel arrangements
Module 8 : Time Management Skills
Module 8 : Time Management Skills
Module 9 : Invoicing/Petty cash
Module 9 : Invoicing/Petty cash
Module 11 : Customer Complaints Management
Module 11 : Customer Complaints Management
Module 13 : Document Presentation and Proofreading
Module 13 : Document Presentation and Proofreading
Module 14 : Confidence Building Module
Module 14 : Confidence Building Module
Module 16: How to Organise Effective Meetings
Module 16: How to Organise Effective Meetings
Module 17: How to use Microsoft Outlook
Module 17: How to use Microsoft Outlook
Module 18: How to use Excel – the Basics
Module 18: How to use Excel – the Basics
Module 19 : How to use PowerPoint (Basics)
Module 19 : How to use PowerPoint (Basics)
Module PDF's
Module 1: Introduction to the PA Course
Module 3 : Business Letter Writing
Module 4 : Composing faxes, memorandums and emails
Module 5 : Telephone skills as a PA
Module 6 : Hotel and travel arrangements
Module 8 : Time Management Skills
Module 9 : Invoicing/Petty cash
Module 11 : Customer Complaints Management
Module 13 : Document Presentation and Proofreading
Module 14 : Confidence Building Module
Module 16: How to Organise Effective Meetings
Module 17: How to use Microsoft Outlook
Module 18: How to use Excel – the Basics
Module 19 : How to use PowerPoint (Basics)